This post may contain affiliate links. Please read our disclosure policy.
These mini braided Easter breads are one of those recipes that feel special, but are actually simple once you understand the process.
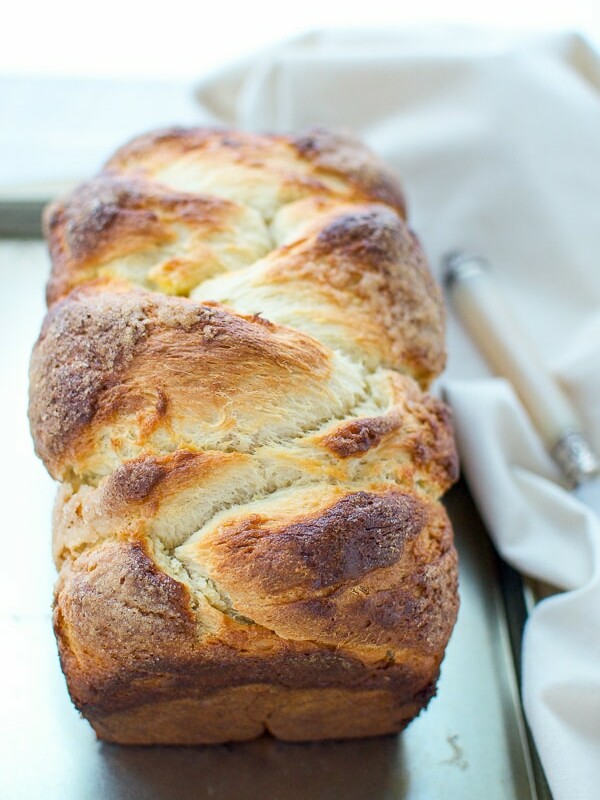
Soft, slightly sweet, and flavored with vanilla and citrus, they bake up golden with that classic stringy texture you want from a proper Easter bread. The colored egg in the center makes them festive, giftable, and perfect for your holiday table.
Each one is just the right size for 2–3 people – though honestly, no one wants to share.
I’ve tested this recipe many times after years of failed attempts, and this version works. If your Easter bread hasn’t risen properly before, this will help you fix that.
Check this blog post for more Easter Recipe ideas.

Table of Contents
- Why This Recipe Works
- What You’ll Need
- How To Make Mini Braided Easter Bread
- Recipe Tips (this is where you win or lose this recipe)
- Texture Goal
- Add-Ins:
- Flavor Options
- Storage
- Why Your Easter Bread Doesn’t Rise (And How To Fix It)
- Extra Baking Tips (That Actually Matter)
- More Easter Recipes:
- Mini Braided Easter Bread Recipe
Why This Recipe Works
- Perfect for gifting or small gatherings
- Soft, fluffy, pull-apart texture (not dry or crumbly)
- Simple dough with reliable yeast activation
- Mini size = easier shaping + baking
- Balanced flavor from vanilla + citrus
Since I’m on a low carb diet, I wasn’t sure if I wanted to bake Easter bread. But a friend told me that my Bulgarian Easter Bread is the best one she’s ever tried, so I can’t afford to not make any this year!
What You’ll Need
- Egg wash + sugar topping
- Yeast, warm milk, sugar
- Eggs, butter, flour
- Vanilla + lemon (and optional orange zest)
- Colored eggs for the center

How To Make Mini Braided Easter Bread
1. Activate the yeast
Mix yeast with warm milk and a little sugar. Let it sit until foamy.
If nothing happens → your yeast is not active. Start over.
2. Make the dough
Mix eggs, sugar, milk, vanilla, and yeast mixture.
Add flour and salt, then mix into a soft dough.
3. Add butter + knead
Work in softened butter gradually.
Knead until smooth, soft, and slightly sticky.
4. First rise
Cover and let the dough rise until doubled.
This usually takes 2–3 hours depending on temperature.
5. Shape
Divide into 4 portions.
Roll into ropes, braid, and leave space in the center.
Place the colored egg in the middle.
6. Second rise
Let the shaped breads rise again until puffy.
7. Bake
Brush with egg wash, add sugar or sprinkles.
Bake until golden and cooked through.

Recipe Tips (this is where you win or lose this recipe)
- Check your yeast first
If it doesn’t foam, it won’t work. This is the #1 failure point. - Milk temperature matters
Aim for warm (not hot). Too hot kills yeast. Too cold won’t activate it. - Use room temperature ingredients
Cold eggs or butter slow down the rise. - Don’t overbake
This is what makes Easter bread dry. Bake just until done. - If browning too fast
Cover loosely with foil and finish baking. - Every oven is different
Watch the bread, not just the time.
Texture Goal
You’re aiming for:
- Golden outside, not dry
- Light, soft crumb
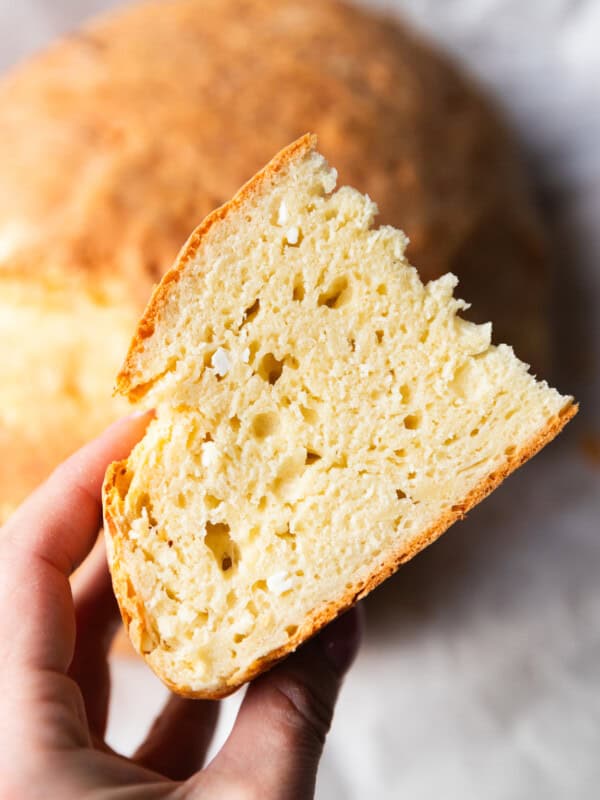
- Slightly stretchy / “stringy” inside
Add-Ins:
Add these after first rise:
- Candied citrus peel
- Nuts (almonds, walnuts, pistachios)
- Raisins
Flavor Options
- Vanilla + lemon (classic, clean)
- Add orange zest for deeper flavor
- Optional: rum, almond extract, or traditional spices like mahleb
Storage
- Warm slightly before serving for best texture
- Keep wrapped at room temperature for 1-2 days
- Refrigerate for longer storage
Why Your Easter Bread Doesn’t Rise (And How To Fix It)
If your Easter bread hasn’t worked in the past, you’re not alone – I’ve had my share of failed batches before getting this right.
Here are the most common reasons and how to fix them:
1. Your yeast isn’t active
Sometimes yeast just doesn’t work – it may be expired or inactive.
Always proof it first.
If it doesn’t foam, don’t continue. Start over.
2. Ingredients are too cold
Cold ingredients slow down or completely stop the rise.
Use room temperature eggs, butter, and liquids.
3. Milk temperature is off
“Lukewarm” is not precise enough.
The ideal range is 100–115°F (38–46°C)
- Too hot → kills yeast
- Too cold → doesn’t activate it
Extra Baking Tips (That Actually Matter)
- Preheat your oven fully
Give it at least 20–30 minutes before baking. - Optional steam trick
Place a pan with water in the oven to create steam for better rise. - Don’t overbake
This is the fastest way to ruin texture.
Bake until golden and just set. - If browning too quickly
Cover loosely with foil and continue baking. - Trust the look, not just the time
Every oven and pan is different – watch the bread.
More Easter Recipes:
- Bulgarian Easter Bread
- Cold Rising Easter Bread
- Easter Bread Muffins
- Roasted Leg Of Lamb
- Slow Cooker Leg Of Lamb

Mini Braided Easter Bread
Ingredients
For the dough:
- 2 1/4 tsp dry yeast
- 1 cup warm milk, 100–115°F / 38–46°C
- 3 eggs
- 3/4 cup sugar
- 2 tsp vanilla extract
- 1 tsp lemon zest
- 1 tsp orange zest, optional
- 1 tsp lemon juice
- 4 1/2 cups all-purpose flour, sifted
- 1/4 tsp salt
- 1/2 cup butter, softened (not melted)
Egg wash:
- 1 egg yolk
- 2 tbsp milk
Other:
- 4 hard-boiled colored eggs
- sugar or sprinkles, optional
Instructions
Activate the yeast
- In a small bowl, combine yeast, 1/2 cup warm milk, and 1 tbsp sugar.
- Cover and let sit for 10 minutes, until foamy.
Prepare the dough
- In a large bowl, sift flour and add salt. Set aside.
- In another bowl, whisk eggs and sugar until combined.
- Add vanilla and remaining milk, then mix in the yeast mixture.
- Add half of the flour and mix until smooth.
- Add lemon juice, lemon zest, and optional orange zest.
- Gradually add remaining flour, mixing until a soft dough forms.
Knead and add butter
- Transfer dough to a work surface.
- Knead while gradually adding softened butter.
- Continue kneading until smooth, soft, and slightly sticky.
First rise
- Place dough in a greased bowl and cover.
- Let rise in a warm place until doubled in size (2–3 hours).
Shape
- Divide dough into 4 portions.
- Cut each portion in half, roll into ropes, and braid.
- Leave space in the center and place a colored egg inside each braid.
- Transfer to a baking sheet.
- Second rise
- Cover and let rise for 30–45 minutes, until puffy.
Bake
- Preheat oven to 350°F (175°C).
- Mix egg yolk and milk for egg wash.
- Brush breads and sprinkle with sugar if desired.
- Bake for 25–30 minutes, until golden and cooked through.
- Cool before serving.
Notes
If it doesn’t foam, it won’t work. Always test it first.
Milk temperature matters
Too hot kills yeast, too cold won’t activate it.
Use room temperature ingredients
Helps the dough rise properly.
Don’t overbake
Bake just until golden — overbaking makes the bread dry.
If browning too fast
Cover loosely with foil and continue baking.
Texture goal
Soft, fluffy, slightly stringy inside — not dense or crumbly.
Add-ins (optional)
Add nuts, raisins, or candied citrus peel after the first rise.
Nutrition
Nutrition information is automatically calculated, so should only be used as an approximation.


This bread is gorgeous, Mira! Not to mention that it looks delicious, too. So perfect for your upcoming Easter celebration, or any other day!
These mini braided breads are simply adorable!
bread looks gorgeous Mira!
I love this! I am going to try this recipe at the weekend and let you know what I think… Thank you for sharing!!
Hope you like it 🙂
Very good. Surprisingly not sweet at all. I added a light icing to sweeten it up a bit but it wasn’t needed. Will make again.
I made this yesterday for orthodox Easter and it’s the best one I have ever made
I have been trying to make it for years and every recipe I have tried has been quite dense but this has the perfect stringy consistency that I want
I added mastixa and Mahlepi also
Thank You
Voula – Australia
Great!So glad you liked these! I agree the texture is amazing and these are super easy to make!
Can you make the dough the night before and leave it out to rise and then bake theming the morning. And also can u use your kitchen aid micro to incorporate your butter without having to do it by hand. Thx Mary D
Hi,
Yes, Kitchen Aid could be used to incorporate the butter.
I wouldn’t make the dough in advance, because it may over prove (I like to have control over it). But it is possible to leave in in the fridge overnight, then let it come to room temperature before shaping and baking.
I’d love to try this recipe even though “I’m not a baker”. I don’t have a stand mixer, but do have an electric hand mixer. Can I use that or hand whisk/mix which is what I usually do when making bread. Thanks
Hi Mary,
Yes, you don’t need a mixer. you can use a hand whisk and then your hands to knead the dough.
Hi. Do you use instant or regular yeast for this recipe?
Regular dry yeast.For instant, the dough will rise quicker.