Crusty No Knead Dutch Oven Bread Recipe
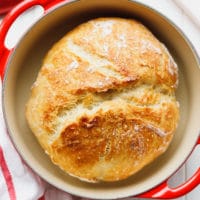
Crusty No Knead Dutch Oven Bread Recipe – easy to make with just a few basic ingredients, no special equipment. Let to rise overnight and baked in a Dutch oven. The perfect homemade bread, a foolproof recipe.
Finally sharing my favorite recipe and tips to make the best Crusty No Knead Dutch Oven Bread Recipe.
Weather has been freezing and unpleasant around here this week. I did a lot of cooking, while staying inside.
Some hearty soups and slow cooker meals that perfectly go together with this Dutch oven bread.
I usually make this bread when I know I don’t have any store bought bread and I won’t be able to go shopping in the morning, but still want to make sure I have bread in the house.
It is so good, crusty and delicious, while still warm.
What ingredients do I need to make this No Knead Dutch Oven Bread Recipe?
- all-purpose flour
- dry yeast (instant yeast, even rapid rise yeast will work, rising time will be 7-8 hours, instead of 12)
- salt
- warm water (115 F)
How long does it take to make this Crusty No Knead Bread Recipe?
This Dutch oven bread takes 5 minutes to make, but it reuires 10-12 hours rising time, preferably overnight. Keep this in mind, if you decide to bake the bread and get excited, but have missed the longer rising time step.
It also takes about 1 hour to bake the bread in the oven.
Do you need a Dutch oven to bake this No Knead Bread?
While Dutch oven works best and the recipe is called “Dutch Oven Bread”, you can still make thisCrusty No Knead Dutch Oven Bread Recipe if you don’t have one.
Make sure you have a pot or baking dish that will fit the dough and is oven safe up to 450 F. Also having a lid is recommended.
What kind of flour to use?
All-purpose flour works great in the recipe. If you’d like to take a step further, you can use bleached or even bread flour.
If you happen to have only unbleached flour, it will work, too.
What type of yeast shall I use to make Crusty No Knead Bread ?
I recommend using dry yeast like Red Star or Fishermans.
Rapid rise yeast works as well, the bread will rise in 7-8 hours, instead of 10-12.
I have not tested the recipe with live yeast, but if you do the correct conversions, I’m pretty confident it will work.
How do you make No Knead Bread?
- Stir all ingredients in a bowl. Do not knead.
- Cover with plastic wrap.
- Let it stand at room temperature for 10-12 hours to rise.
-
Place a dutch oven (any Dutch Oven a size from 4 Qt to 6 Qt will work) with the lid on (lid and knob have to be heat proof) and preheat at 450 F for 30 minutes.
-
In the mean time transfer the dough to a floured surface and gather into a ball. Place on a large piece of parchment paper.
-
Carefully take the Dutch oven out of the oven and remove the lid. Transfer the dough with the parchment paper to the Dutch oven. Cover with the lid and bake for 30 minutes.
-
Remove the lid, continue baking for 30 more minutes. Take out of the oven and let the bread cool inside the Dutch oven for 15 minutes, then carefully remove and cool to room temperature. Slice.
Can you freeze the no-knead bread dough or refrigerate it?
Both freezing and refrigerating are an option, but I wouldn’t do it, because it will affect raising time. If you decide to refrigerate the no-knead bread dough overnight, the dough might rise to some point, but you still have to take it out at room temperature so it can bubble and double its size.
To freeze this Dutch oven bread dough, freeze it in a zip lock bag right after you stir it. Then take out to room temperature and let it defrost and rise for up to 15 hours.
What to serve this Dutch Oven Bread with?
Crusty No Knead Dutch Oven Bread Recipe
Ingredients
- 3 cups of all-purpose flour
- 1 tsp salt
- 1 tsp dry yeast
- 1 1/2 cups warm water — 115 F
- corn meal or extra flour
Instructions
-
In a bowl combine flour, salt and yeast.
-
Pour the warm water over the flour mixture and using a wooden spoon stir to form a dough.
-
Cover and let the dough rise to double its size for 10-12 hours.
-
Place a dutch oven (any Dutch Oven a size from 4 Qt to 6 Qt will work) with the lid on (lid and knob have to be heat proof) and preheat at 450 F for 30 minutes.
-
In the mean time transfer the dough to a floured surface and gather into a ball. Place on a large piece of parchment paper.
-
Carefully take the Dutch oven out of the oven and remove the lid. Transfer the dough with the parchment paper to the Dutch oven. Cover with the lid and bake for 30 minutes.
-
Remove the lid, continue baking for 30 more minutes. Take out of the oven and let the bread cool inside the Dutch oven for 15 minutes, then carefully remove and cool to room temperature. Slice and enjoy.
-
Store bread in a paper bag for 2 days at room temperature.
Hello,
Have you try doing this recipe in individual size (for example using the Le Creuset Mini Cocottes)? My question, if you have made individual sizes, is if you separate the dough after it has risen for 12 hours or before?
Thanks in advance.
Raquel
Hi Raquel, this is a great idea! I have not tried it, but definitely will. I think separating the dough after it is risen should work well. Let me know what happens.
Do you bake the bread with the parchment ? The instructions aren’t clear if you let it cook or just rest on the parchment. Let me know – dying to make this !!
I cook with the parchment and have no issues.
I pointed out on Le Creuset’s Instagram that this is a very popular recipe (if not the most popular) from the NY Times. It originated from a professional baker and was published with accreditation by Mark Bittman in the NY Times. I looked at your recipe eagerly for a new twist, but it turns out that it’s simply someone else’s recipe. Maybe you didn’t realize that a recipe is intellectual property? Or that it takes a lot of time and expertise to get one just right? I do hope that you take this a gentle reminder to post a little byline and give credit to the creatives in our world. It seems that you blocked me rather than just added a little byline. I would encourage you to set a good example for your many followers–which you should be proud of–by rethinking your engagement with other people’s creative output.
Thank you for pointing out. I actually did not get the recipe from NY times, but from a cook book and did change it a little. Recipes are not patented. Ingredients can not be copyrighted. I never used their photo or exact recipe. Stolen photos are intellectual property, and all photos are mine. What exactly do you want from me? Seems like you want me to give credit to NY times and keep posting the link to them on my feed. I have the right to decide what links are allowed on my feed and what not. You sounded a little rude on IG. I’ve taken the time to test the recipe and photograph it, please understand that this also takes time. If you look online other websites have posted versions of this bread, but you are after me. Did you go to each site and made rude comments?
Actually, Mark Bittman did an interview with Jim Lahey from Sullivan Street Bakery in NYC.
It’s on a YouTube video FYI. I’ve seen a lot of these similar recipes and I suspect that if Lahey or Bittman had a problem it would not be broadcast on YouTube.
Thanks for the research and pictures .
Imagine coming at you so hard just for her to be so wrong about recipe copyrights lol. Her energy would be better spent going after blogs that literally steal recipe photos directly from other bloggers if that’s the fight she wants to spend her time on.
I’m looking forward to trying this recipe (and never would have clicked on a NYT link to find it because I prefer finding recipes from blogs).
Thanks Lisa! I left this comment on purpose. I never did anything wrong, I make the recipe regularly and I gave credit to the author. This reader wants to point out that the recipe isn’t mine and it is ok with me, of it is soo important to her to do it, we do have freedom of speech… Hope you like the bred! Have a great day!
Thank you for sharing this rustic bread recepì , being Italian .. we like our bread crusty , rustic 😊 and this is perfect !
Carrie , you obviously have to much time on your hands .. I find you annoying
Prepped this last night and made it this morning. Turned out perfect. Thanksgiving for posting.
Is the Nutritional Information based on the whole loaf or an individual slice of bread?
It is for the whole 1 loaf of bread.
Good answer. And recipe, thanks.
Glad you addressed that comment. Keep posting wonderful recipes! I first saw a similar by Test Kitchen and always loved it. I too have changed it here and there to our taste and things that might work a little different. I have passed along this recipe many times over the years.
Hello Ladies , my bread looks great from the outside .. however the inside looks undercooked . I
Following directions .. it’s my 3rd time trying . Any advice would be appreciated .. the crust is fabulous 👍
Hi Anna, Cook it for longer, let it cool completely, before slicing. Without more details, I can not tell what went wrong.
Thank you so much 😊 will try cooking longer .. 😊
You’re bread comes out better and better with each try 🥰 my Grandkids enjoyed it so much today with my eggplant parmigiana 🌷you were right in letting it cook a bit longer before uncovering and cooking the crust .. simply delizioso ❤️ thank you
Hi! Could you add ingredients like olives or black garlic to this recipe? If so, when would you add it? Thanks!
Yes, you can add them before you transfer to the baking dish, just loosely stick them into the loaf, don’t knead
I have a 3 quart Dutch oven. Would that work?
Yes, it will work
This recipe is awesome!! Just mixed up another loaf and I added 1 tablespoon of Italian seasoning and 2 tablespoons of dried onions. Smells good already!!
Did you add those in the dry ingredients at the beginning before adding water or did you put them on top after rising?
The bread is only good for 2 days?
Yes, it is perfect for 2 days, but you can store it for longer time.
I love how easy this recipe was for me to put together. Thank you so very much for taking the time to post this amazing recipe. I have made it several times already. Awesome very time!
What is the corn meal or extra flour for?
It is used to put on the parchment paper so the bread doesn’t stick to it. It is totally optional though.
Hello there! So I have a question/concern. I was attempting your recipe & it calls for 11/2 cups of water… is it meant to be 1/2 cups of water? I thought 11 sounded like a lot so I did half (5 cups) & my mixture was very watery so I had to add an extra 4 cups of flour. So I feel my measurements are all out of whack but hopefully it still turns out good! fingers crossed, its rising right now.
Hey Annalysse,
so sorry, it is one and a half cups of water. Hope you decide to try it again and like it!
What can I do to make the outside less hard?? Leave the lid on longer?
You can cover with a towel while the bread is still hot, until it cools down completely.
Hi, I combined all the ingredients but my dough is crumbling. What did I do wrong?
It should not be a problem. Please let it sit at room temperature for 10 hours then follow the instructions.It should be ok.
Hi there! Thank you for this simple recipe, will be trying it today. First time making homemade bread. Can i make this if i don’t have a dutch oven?
Hi RC, yes, you definitely can. Use an oven save pot, make sure is is safe for up to 450 F and no plastic handles 🙂
I don’t understand why you removed my comment and didn’t answer my question. Rude much?
I’m going to use instant yeast and I’m wondering what happens if you let it sit for longer than 10 hours? Will it make any difference to the finished product?
The optimal time is between 10-12 hours at 75 F. You can definitely leave it sit longer with dry yeast, but the temperature of the room shouldn’t be too high.
I tried this today and it didn’t rise. I should have been suspect at it calling for only 1 tsp of yeast. Sigh.
Sorry, the reason for the bread not rising is not the 1 tablespoon of dry yeast. Was your yeast old (expired) or opened a while back? Please provide more details on the process of making the bread. I’m willing to help, because I’ve never had a reader say the bread did not rise.
Is it a Teaspoon or Tablespoon of yeast? You say tablespoon here in your reply, but the recipe lists a teaspoon.
Please advise.
It is a teaspoon. Sorry, I’ll fix this asap.
Hi I’ve tried the recipe and although it tasted great but it didnt have air pockets from inside I used instant yeast if that’s matter
I have a brand new pink dutch oven with enamel. Will the baking of the bread stain it? I’m trying to decide if I should wait and get with without enamel to do it. Thank you!
Hi, I don’t think it will stain it, but to be honest, I always bake on parchment paper and it works fine. I suggest that you bake it on parchment paper, the paper will brown, but won’t burn. Let me know how it works.
Can you use wheat flour in this recipe?
I personally have not tried it with whole wheat flour, but a lot of people like the final result. The amount of water needs to be increased to 2 cups, from what I’ve heard.
Is there a way to make it a little “less crusty”? Could I bake for 45mins covered and 15 uncovered for a softer/thinner crust? Just trying to get an idea of what variations could be made. Thank you!
It should make the crust less “crusty” :), if you take it out of the Dutch oven immediately after baking and cover it with kitchen towel for 20-30 minutes.
When removing from the bowl, do you punch it down? Or try to gently coax it out?
I have never made a bread I didn’t knead first, so I’m a little thrown.
Thanks for any help you can offer!
I usually don’t punch it down, but you can do it. I scrape the dough out of the bowl with a spatula and then roll it into a bowl. Hope you like the bread!
Hi I’ve tried the recipe and although it tasted great but it didnt have air pockets from inside I used instant yeast if that’s matter
Hi Sarah, sometimes it is the yeast, it may need extra time to develop the air pockets or you just need to use a different brand of yeast.
Excellent and very easy!
If using instant yeast do you still use 1 teaspoon or less
Yes, one teaspoon of instant yeast
I found that there is a bit in the middle of the bread to be doughy, is there something I am doing wrong?
I think you should bake it a bit longer, this should eliminate the doughiness. (5-10 minutes, covered with foil if it is too browned)
Followed the recipe exactly and just needed to end up pulling from the oven a bit early (I know my oven runs hot so I was keeping a close eye). This was perfectly crusty and amazing! Have made it 3 more times in 2 weeks and it’s always gone by the end of the day!
Hi Serena, glad to hear you liked it! I’ve been making this bread almost every day for the last week 🙂
Finally! A bread that I can actually make! I followed the instructions exactly and it turned out perfectly. Thank you!
When you say “dry yeast”, is that the same thing as Red Star’s “active dry yeast”?
Yes, active dry yeast
Thank you so much for this recipe! It came out perfect! Will definitely be using this recipe over and over again.
Hi! Can it be left out longer than 12 hours? New to the bread game. Lol.
No, longer than 12 hours will create a weird taste.
I posted my comment yesterday but now I don’t see it here. I am using active dry yeast that calls for the yeast to be activated before being added to the recipe. How does this work with this recipe? I saw someone else mention using active dry yeast and you said it is exactly the same. Can you please advise?
Hi,
for some reason I don’t see the comment. Dry active yeast is the same and no, you don’t need to activate it in this recipe, just use it following the instructions for making the bread.
I’m wondering, you want me to bake this bread for one hour on 450degree oven? I see I preheat the Dutch oven for 30 minutes before adding dough. Do I turn down the temp to bake the bread?
I usually don’t turn the temperature down, but you can turn it to 400F. Don’t worry, the bread will not burn.
Hi Mira,
I am wondering since the oven is at 450F for an hour, is the oven rack in the center or lower?
Thanks for the recipe.
Hi Connie, it takes between 45 and 60 minutes, depending on the oven and desired browning. I’ve never had the rack in the middle lower, when I make this bread in the USA, but when I’ve baked it in Europe, (my oven is different) and the rack has slightly lowered (deformed).
I have made this bread twice. It turned out very nicely. However, I don’t understand turning it out of the bowl onto a floured surface and then shaping it into a ball? After the dough has more than doubled in size and I try to manipulate it into a ball, all the bubbles have gone and the size is back to the size it was just after mixing. My finished loaf does not have a lot of air spaces.
I really want to make this. Sounds wonderful and easy. I am not sure what to cook this in. I have a Dutch oven but it has silicone handles on pot and lid. Not sure if it can take the 450. This maybe a dumb question but could I cook in a stainless soup pot with a glass lid? Do you think I could grease the sides of the pan?
Hi,
Yes, you can cook it in a stainless steel pot, but I’m concerned with the glass lid. Not sure if it is going to take that high of a temperature. Do you have a stainless steel lid?
Hi, made this bread this morning and it was delicious, crusty on the outside moist and full of bubbles on the inside. My only problem was that the bottom of the loaf was quite hard/chewey and difficult to cut. Any recommendations on how to get the bottom to come out like the rest of the loaf? Thanks!
Oh goodness! Both a blessing and a curse!
Such an incredibly easy recipe!
Such delightfully delicious bread!
Watch out waistline!!
I just finished up eating a slice of this new to me recipe. It’s probably one of the better ones I have tried but I still can’t get the bottom crust to not be like a brick😳.I even shortened the cooking time by 15 mins during the uncovered time in the oven. How can I improve this? Any help is appreciated.
Hi Tracy,
I’m not sure what the type of oven and Dutch Oven you use are, but you can try lowering the temperature to 400 F, also move the oven rack higher, so the baking dish is further away from the heat. Also remember, that this is a no knead crusty bread and the crust is thick, but it should be edible, not unpleasant to eat. Let me know, if you make any changes and how it turns.
EASIEST, most delicious bread recipe! I used instant yeast, let it rise the 12 hours and baked it exactly as directions instructed. It had the wonderful airpockets, tender bread and the right amount of crustiness! If anyone has used whole wheat flour, please let me know. Thanks for a great foolproof recipe!